Reverse engineer PET998D trainer collar
Decoding 433MHz signals
Project maintained by shockcollar Hosted on GitHub Pages — Theme by mattgraham
For a recent project I had to control a dog trainer collar from a Raspberry pi without the remote control. The collar which I had was a cheap PET998D model. This model has 4 modes of operation:
- Static shock (0-100 level)
- Beep
- Vibrate (0-100 level)
- Lamp (makes an LED on the led light up)
All of this can be controlled from the remote control. The remote operates at 433.825MHz - 433.92Mhz frequency.
Decoding the signals
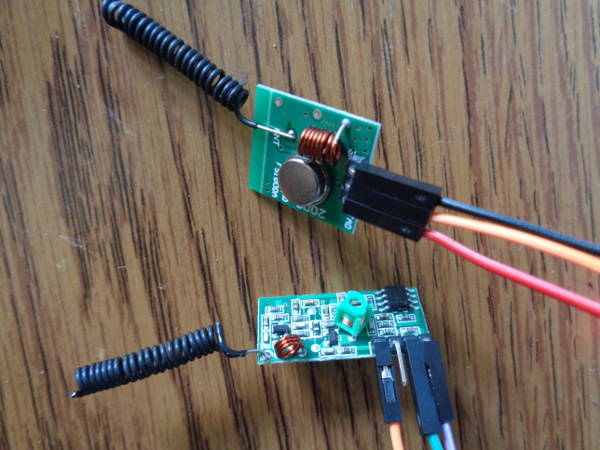
To reverse engineer the signal, I have bought a cheap 433.92MHz transimmer and receiver module, namely this one which was less than a dollar with free shipping.
This contains one MX-05V receever and a MX-FS-03V transmitter. They are supposed to work on 433.92MHz range, however, they may not be exactly precise, fortunatelly they have been able to communicate with the collar with no issues. To increase the range, I have wound a simple spiral antenna for both modules.
This module are really simple, they are basically analog, what you send into the transmitter, you will see it on the receiver. They are using amlitude modulation to achieve this, meaning the amlitude of the signal will be higher or lower depending on the input voltage. With this modulation on-off keying can also be observed.
In order to be able to observe and record the signals I have connected the output of the receiver module to my audio card (aka. line input) using the following circuit:

_Image from steftech.wordpress.com_
Alternatively an oscilloscope can be used, or the receiver can be directly connected to an Arduino, Raspberry pi, or similar device.
After recoding the line input in Audacity and pressing a button on the remote the following popped up in Audacity:

Based on the sampling frequency (48000Hz) and the number of samples reported by Audacity, it’s easy to calculate how long each high and low is (1/48000 * sampleNumber). Each message starts with a long on pulse, a long off, then the data with the following modulation: long on followed by a short off is “1”, and a short on followed by a long off is a “0”. This is a basic on-off modulation, there is no other encoding or modulation present.
To remove the manual component of decoding the signal, I have written a Python script using Pyaudio that records input from the sound card and decodes the above mentioned simple protocol into a binary sequence. One thing that makes this more challenging is that the 433MHz receiver module automatically adjust the gain if it founds no signal, so before the button on the remote is pressed it picks up lots of really loud looking noise. Once the button is pressed, the noise goes away.
Here is the decoder source
With this program running, I have pressed buttons on the remote, making sure to note the strength and mode. Here is a couple of example data:
vibrate:
10000010001101010010001000000000101111100 -> strength=0 collar1
10000010001101010010001000000001101111100 -> strength=1 collar1
10000010001101010010001000000010101111100 -> strength=2 collar1
10000010001101010010001000000011101111100 -> strength=3 collar1
10000010001101010010001001100100101111100 -> strength=100 collar1

shock:
10000001001101010010001000000000011111100 -> strength=0 collar1
10000001001101010010001000000001011111100 -> strength=1 collar1
10000001001101010010001000001010011111100 -> strength=10 collar1

lamp:
10001000001101010010001000001010111011100 -> collar1
11111000001101010010001000001010111000000 -> collar2

sound:
10000100001101010010001000001010110111100 -> collar1
11110100001101010010001000001010110100000 -> collar2
Looking at the numbers that are changing as I change strength and mode, it’s pretty easy to understand the protocol.
Without further ado, this is the sequency of bits sent:
1bbbkkkk00110101001000100xxxxxxxaaaaddd00
Where:
- xxxxxxx = strength in binary
- a,k = mode (shock, vibrate, etc.)
- vibrate (a=1011, k=0010)
- shock (a=0111, k=0001)
- lamp (a=1110, k=1000)
- sound (a=1101, k=0100)
- ddd = device (111 or 000) that is paired with collar
- bbb = inverse of d
Rest of the bits did not change during any combiniation of button sent. Most of the bits in the center are the identifier of my remote control (this is what gets paired with the collar), and some probably are just padding/placeholder/errorcheck bits.
Here is the program to send commands to your collar using a Raspberry Pi:
If you want to use this code to send commands to the collar, you probably will have to modify the id in the above code, or pair this id one with your collar (the same way, documentation says, but use the transmitter instead of the original remote)
Notes:
- Surprisingly there are no checksum present, therefore if a bit error happens in the wrong place it could have quite bad consequences
- Strength seems to accept values above 100 (up to 128), but I’m not sure, if the response get stronger above 100.
- RPI (and Python) may not be the best device to send time sensitive bits like this, however I have seen no issues so far, but make sure PRI is not running heavy load during the program run